Learn to master parking maneuvers with precise techniques, reference points, and practical parking tips for stress-free parallel parking success.
Learn to master parking maneuvers with precise techniques, reference points, and practical parking tips for stress-free parallel parking success.
Test Centre: Wood Green
Date: 22nd April 2026
Test Centre: Pinner
Date: 31th April 2026
Test Centre: Croydon
Date: 4th May 2026
Test Centre: Erith
Date: 7th May 2026
Test Centre: Barking (Tanner Street)
Date: 9th May 2025
Test Centre: Isleworth
Date: 18th May 2026
Test Centre: Hendon
Date: 4th May 2025
Test Centre: Hither Green
Date: 27th May 2026
Test Centre: Tolworth (London)
Date: 1st May 2026
Test Centre: Tolworth (London)
Date: 1st May 2026
Parking isn't a natural-born talent; it’s a mechanical formula. We’ve all felt the pressure of a waiting line of cars while attempting to squeeze into a tight spot, wondering if the vehicle has suddenly grown three sizes. In practice, the best parking tips rely on strict consistency rather than luck or intuition to overcome this common anxiety.
By shifting to the "Driver's Seat Perspective," you stop guessing and start measuring. Mastering these parking manoeuvres involves identifying specific "reference points"—parts of your car that visually align with the kerb or neighbouring vehicles. Once you learn to trust these landmarks over your feelings, city kerbside parking tips become simple to execute, transforming a stressful gamble into a repeatable sequence.
Most parking attempts fail before the car even moves backward. If you start in the wrong spot, no amount of steering adjustment can fix the angle later. We call this initial position the Anchor Point. Think of your rear wheels as the hinge on a door; they act as the Pivot Point that the rest of the vehicle swings around. To ensure your car rotates into the space without clipping the bumper ahead or mounting the kerb, you must establish this "hinge" in the exact right locati0n.
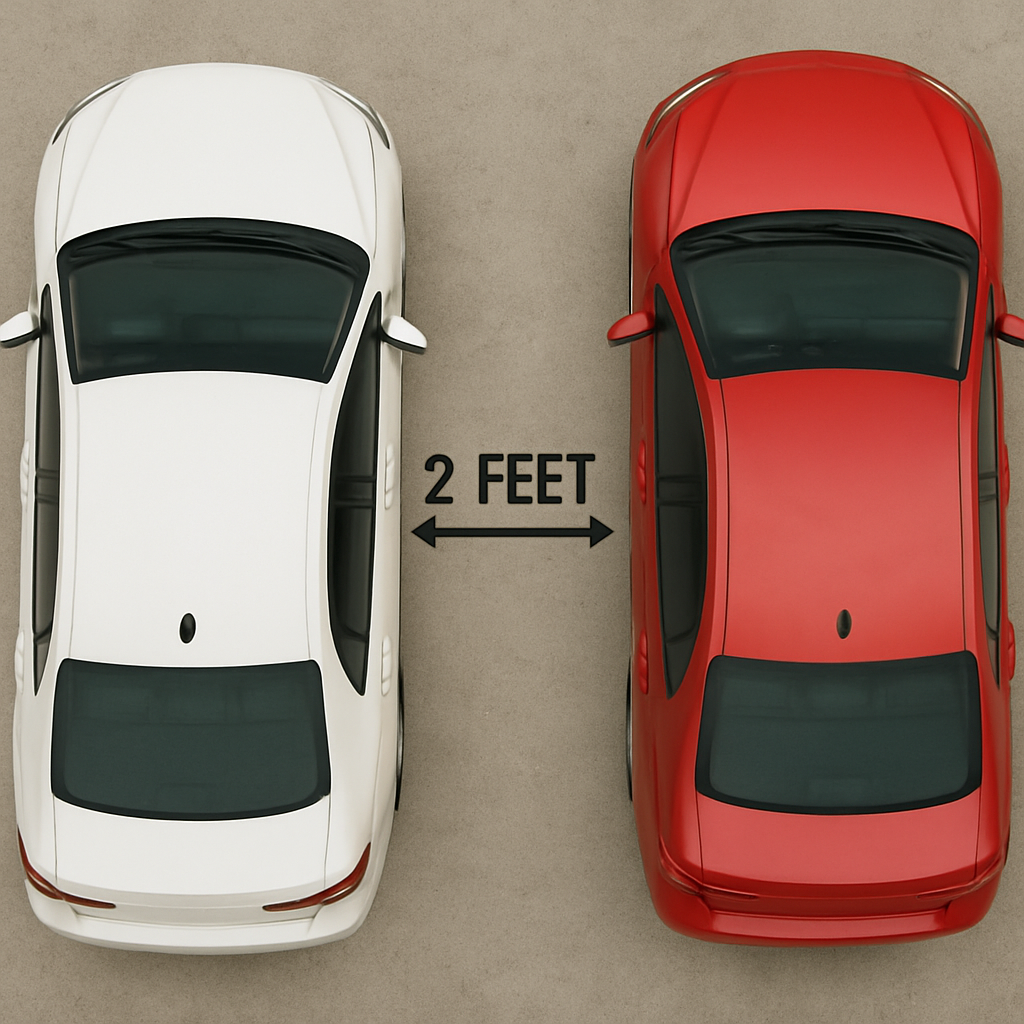
Distance is just as critical as alignment. When you pull up alongside the parked vehicle, you are setting the limits of your vehicle turning radius guide. If you are too close, your rear end can’t swing in sharply enough; too far, and you will finish wide in the street. Aim for a two-foot gap—roughly an arm’s length—between your passenger door and the other car. This spacing creates the necessary room for the car to rotate cleanly.
To lock in this setup safely, run through this mental checklist:
With your Anchor Point set, you are ready to begin the rotation in "The 45-Degree Swing: Mastering Your First Move."
Once you are aligned at your anchor point, resist the urge to hit the accelerator immediately. Instead, while your foot is firmly on the brake, turn your steering wheel all the way to the right until it stops turning—a position mechanics call "full lock." This creates the sharpest possible turning arc and eliminates the variable of trying to steer and reverse simultaneously. By committing to this fixed steering angle while stationary, you ensure the car follows a consistent, predictable path rather than wandering into traffic or the parked car ahead.
As you slowly ease off the brake to creep backward, your attention must shift entirely to your driver-side wing mirror. You are scanning for a specific visual landmark that acts as your stop signal: the full front bumper and number plate of the car behind the empty space. When this image appears in the centre of your mirror, your vehicle has reached a perfect 45-degree angle relative to the pavement. Using reference points effectively like this transforms a stressful guess into a precise measurement, ensuring you are deep enough into the spot without over-rotating.
Holding this diagonal position is crucial because it establishes the necessary geometry for your front end to swing in later. Pause the car completely once you catch that number plate in your view; going further pushes your rear wheels too close to the edge of the road. Knowing where to look while reversing allows you to monitor your trajectory and avoid hitting the kerb before you even get close to it. With your car now perfectly angled, you are ready to reverse the wheel in "The Final Tuck: Straightening Up and Clearing the Kerb."
With your car frozen at that perfect 45-degree angle, turn your steering wheel back to the centre position so your tyres point straight. Slowly reverse in a straight line while scanning the environment. You are looking for a specific visual cue: the moment your car’s B-pillar—the vertical post between your front and rear windows—aligns with the rear bumper of the vehicle parked in front of you. This alignment acts as your safety clearance, guaranteeing that your front end has enough room to swing past the lead car without making contact.
Once that door post matches up with their bumper, stop momentarily and turn your wheel all the way to the left. This action transforms your rear drivers-side wheel into a pivot point, swinging the nose of your car into the kerb like a closing door. Many drivers panic here, fearing they will hit the kerb, but trust the geometry; if you waited for the B-pillar alignment, you have created the necessary space. This specific timing is one of the most effective parking solutions for parking in tight spaces without scraping your bumper.
Continue reversing slowly until your car is parallel with the kerb, using your wing mirror to monitor the gap. While moving, keep checking vehicle blind spots for pedestrians or cyclists who might try to squeeze through. To lock this process into your muscle memory, simply recall the "Right-Straight-Left" sequence:
If you finish the movement and realize you are too far from the kerb or slightly crooked, don't worry—it happens to the pros, too. We’ll fix that in "The Crooked Park Cure: How to Adjust Without Panicking."
Parking is not a test of character; it is a mechanical formula. If you finish your manoeuvre and look jagged, remember that correcting a crooked park isn't a failure—it is simply the final step of the process. Rather than panicking when you recognize what are common parking mistakes, such as ending up too far from the kerb in a "One-Way Street Squeeze," simply adjust using the "Forward-Back Shuffle."
To nudge your vehicle closer without pulling out completely, use this sequence:
While the benefits of rearview cameras include verifying your final distance, continue trusting your mirrors and reference points to guide the steering. To lock this in, spend five minutes in an empty car park this weekend practicing your setup. With a little repetition, the panic will fade, replaced by the quiet confidence of knowing exactly where your car fits.
📚 Part of our Driving Test Booking Guide
This article is part of our comprehensive guide. View all Driving Test Booking articles →